
Implementing a Clean Architecture Modular Application in Nuxt/Vue Typescript Part 1: Domain Layer
Published on Feb 20, 2021 by Diego Rodriguez Mancini.
Introduction
This is a documentation/tutorial article that I write mostly for myself as a way of learning how to create more modular and testable applications with Vue.js or Nuxt. The article will cover the process for creating an example todo application (yes, not very creative) using Nuxt, while following the Clean Architecture Pattern.
Stuff we will see:
- Clean architecture within Nuxt
- Test Driven Development
- Unit testing vue components
- Unit testing vuex modules
- Vue class components and Vuex class modules with Nuxt Property Decorator
- Dependency injection with Inversifyjs
- Error handling with Result class
Also we will use Typescript, only because it’s getting more popular, but that is for a reason. Typescript can help reduce errors in development by 15%, acording to this publication. It is also useful for working with other developers, as each component property, class attribute and function argument can have its type defined in the code, serving as documentation. For this and more reasons typescript is becoming more and more popular. Even Vue 3 was created in typescript and will become the standard in the future.
The full code can be found in this repo and this post is highly influenced by this article, so check that out as well.
Clean Architecture
Clean arhcitecture is a design pattern that aims to separate application logic from user interface or external services. It does that by defining layers in a circle, in which each layer can only interact with other layers towards the center of the circle. In Vue terms, the layers would be (from outer to inner) Components + Store -> Use cases -> Entities, as shown by the following figure:
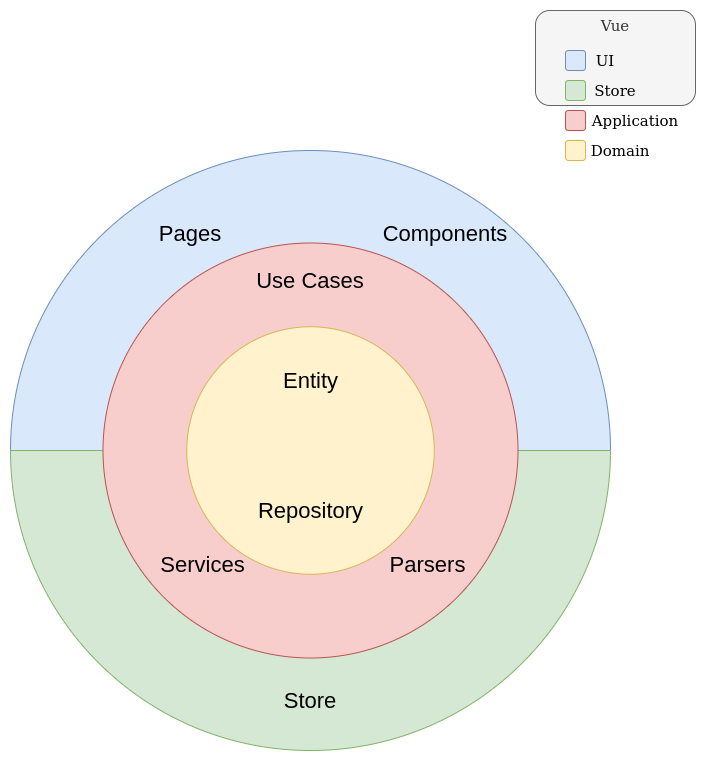
Figure 1: Clean architecture within Vue
The domain layer contains entities wich define the basic data that our application will use. The Application layer contains all the logic and operations applied to the entites. The UI/Store layer contains the user interface, the controllers and presenters, this is mostly the Vue/Nuxt part of the app. There are a few elements that compose each layer we need to define to build an application like this.
Component
This is the vue component we know. Since it contains some logic and also the user interface tied together, it is both the view and the presenter. That means that it is in charge of transforming any data that would be in the store, to a data structure that the interface (buttons, dropdowns, tables, etc) understands.
The component also is in charge of dispatching store actions.
Vuex store
We will be using store modules. You should be familiar with this, but this time we will use the store with a few restrictions: Since store will be our “controller” it is in charge of receiving input from the user (data from the component) and execute an operation with that data. To perform this operations it should call an Interactor instad of perform the logic itself. The Store should only be called from the components (vuex actions) and update its state (vuex mutations) accordingly, leaving all the logic to the inner layer.
Interactor
The interactor is an element that is called from the controller, executes tasks through a service and returns the result to the controller. There should be one interactor for each use case.
Service
In our case, the service is an object that serves as a lookup table for the interactor. All operations should be available in the service. There could be one service for each entity, for example, a TodoService would have all the logic for interacting with the Todo entity, like fetching, creating, editing, deleting. In fact, the Service should implement an interface that belongs to the domain layer, wich defines all the possible usecases. It could also have external services, like HTTP services to fetch data from an API.
Notice that what we usually did in the Vuex store, now is delegated to a usecase interactor that calls a service.
Repository
This is an interface that defines all usecases and operations for an entity.
Entity
This is a class or type definition that defines the data and domain restrictions of objects in our application. Validation logic should also be covered by the entity. Even if entities merely describe the data structures and validation logic, we will not be passing entities through layers. Components will never see an entity object, only a serialized representation of the entity.
The following figure shows the interactions between all these elements.
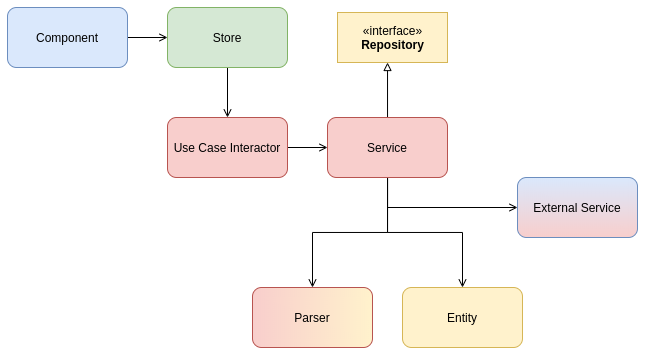
Figure 2: Interactions between the elements of each layer
The Application
We will create a minimal Todo application that is only going to show a list of tasks. You can clone the repository and add more functionalities to practice clean architecture.
Directory structure
Like the introduction tried to sell, we are creating a modular application. So we are not going to use the default Nuxt application structure. The Nuxt directory will be located in a ui folder and will serve as mounting point for the modules. Each module will have domain, infrastructure, usecase and ui directories with their corresponding unit tests.
Application
|- package.json and other project files
|- src/
| |- ui/
| | |- pages/
| | |- plugins/
| | |- static/
| | |- assets/
| | |- layouts/
| |- app/
| | |- modules/
| | | |- task/
| | | | |- domain
| | | | |- infrastructure
| | | | |- usecase
| | | | |- ui
| | |- shared/
| | | |- http/
| | | |- error/
| | | |- storage/
Domain Layer
Entities
For this article I only created a Task entity that will have the data and validation of a task. Let’s start creating the type definitions.
// domain/Task.types.ts

export type TaskState = 'TODO' | 'DOING' | 'DONE'

export interface ITaskData {
  title: string
  description: string | null
  state: TaskState
  schedule: Date | null
  due: Date | null
}

export interface ITask extends ITaskData {
  validate(data: ITaskData): void
  changeState(state: TaskState): void
  serialize(): ITaskData
}
There we have a TaskState type that defines the possible state a task could be: TODO, DOING or DONE. Feel free to add more. On the other hand we have two interfaces, one to represent te basic data structure of the task. This will be the data that will be moving throgugh the layers. And finally we have the ITask interface that has all the validation functions and other domain specific operations.
With the interface defined we can now add some tests that verify the correct instantiation of our Task object and validation.
// domain/__tests__/Task.spec.ts
import { Task } from '../Task'
import { mockTaskData } from './Task.mock'

describe('Task', () => {
  describe('constructor', () => {
    it('should create instance with valid data', () => {
      const task = new Task(mockTaskData()[0])
      expect(task).toBeInstanceOf(Task)
    })
    it('should throw error with invalid date', () => {
      const data = mockTaskData()[0]
      const today = new Date()
      today.setFullYear(today.getFullYear() - 1)
      data.schedule = today
      expect(() => new Task(data)).toThrow()
    })
  })

  describe('changeState', () => {
    it('should set a new state', () => {
      const task = new Task(mockTaskData()[0])
      task.changeState('DONE')
      expect(task.state).toBe('DONE')
    })
  })

  describe('serialize', () => {
    it('should return object with correct data', () => {
      const task = new Task(mockTaskData()[0])
      expect(task.serialize()).toStrictEqual(mockTaskData()[0])
    })
  })
})
We also need to create mock data that will also serve for future tests. Add this to a Task.mock.ts file:
// domain/__tests__/Task.mock.ts

import { ITaskData } from '../Task.types'
export const mockTaskData = (): ITaskData[] => [
    {
        title: 'Create Nuxt App',
        description: 'I have to make a nuxt sample app',
        state: 'DOING',
        schedule: null,
        due: null,
    },
    {
        title: 'Drink water',
        description: 'Always drink water',
        state: 'TODO',
        schedule: null,
        due: null,
    },
]
If we run tests now, with npm run test or just the jest command, we will en with a bunch of failed tests. That’s because we don’t have anything to test yet. Let’s create the Task class and work with it until the tests pass.
// domain/Task.ts

import { ITask, TaskState, ITaskData } from './Task.types'
export class Task implements ITask {
  title: string
  description: string | null
  state: TaskState
  schedule: Date | null
  due: Date | null

  constructor(data: ITaskData) {
    this.validate(data)
    this.title = data.title
    this.description = data.description
    this.state = data.state
    this.schedule = data.schedule
    this.due = data.due
  }

  validate(data: ITaskData): void {
    if (data.schedule && data.schedule < new Date()) {
      throw new Error('Invalid schedule date')
    }
    if (data.due && data.due < new Date()) {
      throw new Error('Invalid due date')
    }
  }

  changeState(state: TaskState) {
    this.state = state
  }

  serialize(): ITaskData {
    return { ...this }
  }
}
We have the constructor that instantiates all data for the task, but it also performs validation first. A simple demo validation was added to verify that scheduled tasks won’t be in the past.
The serialize method returns the ITaskData interface, so that we don’t pass Task instances through layers.
If we run tests now, they should all pass with a high coverage (maybe I’ll make it 100% later).
PASS src/app/modules/task/domain/__tests__/Task.spec.ts
  Task
    constructor
      ✓ should create instance with valid data (2 ms)
      ✓ should throw error with invalid date (3 ms)
    changeState
      ✓ should set a new state
    serialize
      ✓ should return object with correct data (1 ms)

--------------------------|---------|----------|---------|---------|-------------------
File                      | % Stmts | % Branch | % Funcs | % Lines | Uncovered Line #s
--------------------------|---------|----------|---------|---------|-------------------
All files                 |     4.9 |       12 |    7.84 |    5.11 |
 app/modules/task/domain  |      80 |       75 |     100 |      80 |
  Task.ts                 |   92.31 |       75 |     100 |   92.31 | 23
NOTE: If you are having trouble running tests I suggest you take a look at my jest.config.js and tsconfig.json files in the repository so that jest can find the test files.
Repositories
For the repository, we need to define an interface that defines use cases for Tasks. We will add this to the Task.types.ts file.
// domain/Task.types.ts
import { ParseError } from '@@/src/app/shared/error/ParseError'
import { HttpError } from '@@/src/app/shared/http'
import { Result } from 'neverthrow'
export type TaskState = 'TODO' | 'DOING' | 'DONE'

export interface ITaskData {
  title: string
  description: string | null
  state: TaskState
  schedule: Date | null
  due: Date | null
}

export interface ITask extends ITaskData {
  validate(data: ITaskData): void
  changeState(state: TaskState): void
  serialize(): ITaskData
}

export interface ITaskRepository {
  create(): Promise<Result<ITaskData, ParseError | HttpError>>
  remove(): Promise<Result<ITaskData, ParseError | HttpError>>
  edit(): Promise<Result<ITaskData, ParseError | HttpError>>
  getMany(): Promise<Result<ITaskData[], ParseError | HttpError>>
  getOne(): Promise<Result<ITaskData, ParseError | HttpError>>
}
Notice that the repository interface methods are asynchronous, and return a Result object that can contain a serialized task or a Error object. Don’t worry about it now. We will cover this Result class later.
Conclusion
There we have it. We finished the domain layer for this sample application. We defined the directory structure to follow a modular design. Started implementing the application using clean architecture design pattern and successfully finished the domain layer, by creating the corresponding tests first and making them pass with a high enough coverage.
In the next part we will start creating the application layer: TaskService, Parser and HttpService. Also we will cover dependency injection to make the TaskService independent of the HttpService implementation, allowing us to decouple the TaskService if the API changes, we would only need to make a new HttpService implementation.